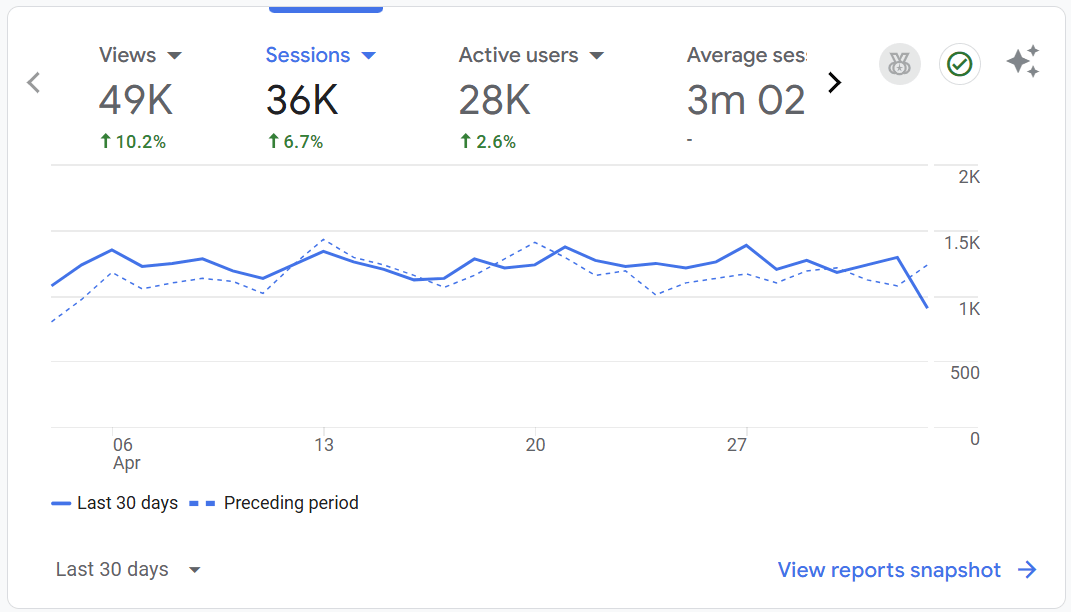
Search engine optimization (or SEO for short) are all the things you have to do for your blog such that Google trusts you and shows your blog posts on the first page of search engine results. SEO might sound complicated and scary, but it’s very simple. I will explain everything to you, give you examples, and teach you how to do good SEO for travel blogs. This is how I grew my blog to 36K sessions in 16 months. This post contains affiliate links. When you make a purchase I may get a small commission at no extra cost to you. Find out more here.
Ready to grow your blog? Check out these helpful resources:
- Web hosting: BigScoots
- Keyword research: KeySearch
- SEO tool for blogging: RankIQ
- Travel affiliate platform for bloggers: Stay22 (get $100 when you get to 100 bookings if you sign up through this link)
On page SEO tips
There are 2 types of SEO you must do: on page and off page. On-page SEO are all the things you have to optimize within each blog post you publish.
Every component of a blog post has to be optimized: the title, the length of the post, the words you use, the headings and subheadings. Everything!
If you want to build a good travel website and become a professional blogger you have to do all of this. Otherwise, your chances of ranking high in Google search results are lower, which means people won’t read what you write, which means you won’t make money.
That’s because there is a lot of content being published, so Google needs to prioritize the most helpful content out there based on EEAT. EEAT is an acronym that stands for experience, expertise, authoritativeness, and trustworthiness. Google decides what to show on the first page of a search based on EEAT.
So at the end of the day these SEO strategies show Google that you have EEAT and that your content deserves to be shown to people.
I constantly tell people that you don’t have to be a good writer to be a successful blogger, you have to be a good strategist. So your writing skills are less important than your basic SEO optimization skills.
I constantly do these 8 things as part of my on page SEO strategy and most of my articles rank on the first page of Google. Let’s go through them.
1. Come up with a strong blog post title
The first step is to come up with a strong title. A strong title usually has about 50 characters, it has a positive feeling, uses the keyword you’re writing your blog post on, and uses some strong, emotional words such as “ultimate”, “best”, “complete” etc.
There are 2 tools I use to optimize my titles: the AIOSEO free plugin, and RankIQ.
AIOSEO plugin
Every blog created on WordPress should have a free SEO plugin. I use AIOSEO because it was the default SEO plugin when I first created my travel blog.
You could also use the Yoast SEO plugin. To be fair, they are all very similar, so at the end of the day it doesn’t matter which one you choose.
Let’s assume you pick AIOSEO. This plugin will show you the score of your title and the score of your entire blog post. It’s a very intuitive plugin.
For example, if you title it good you will see a green color. If it’s really bad you will see a red color. If it’s mediocre you will see an orange color.
And it also tells you what you need to change to make it better. Maybe you are using too many words, maybe your title has a negative feeling associated with it, maybe you’re not using any emotional words. It will tell you what to change.
Once you update the title the score will update instantly so you can continue tweaking the words until you get a green score.
RankIQ
The other tool I use to optimize my titles is RankIQ. RankIQ is an SEO tool designed by a blogger for bloggers. Read my full RankIQ review here.
It’s the best and the most affordable SEO tool out there. I started using it 1 month after I launched my travel blog and I think it’s the main reason why I was able to grow my blog so fast to 36,000 sessions.
It works very well and it’s very easy to use.
All you have to do is take the keyword you want to write on after you did your keyword research, paste it in RankIQ and run a report on it.
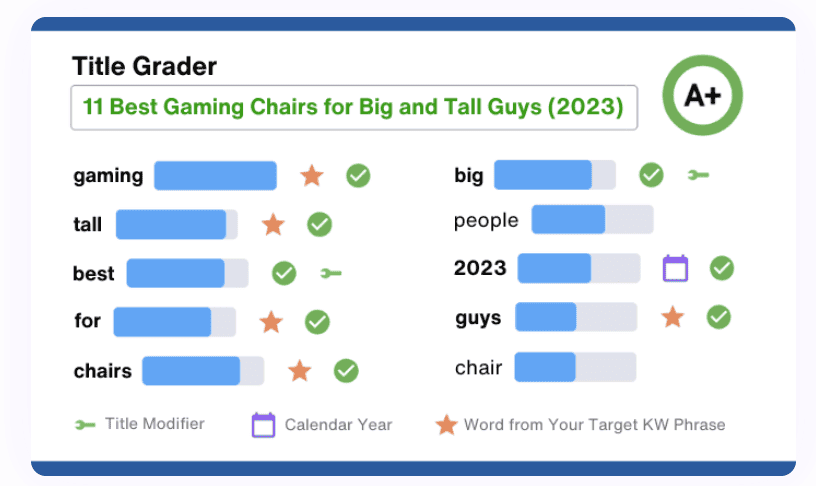
Then in the SEO Report tab you have a Title Grader tool. It shows you some keywords to pick from and it tells you how long the title should be. You can type your title in the tool and it will grade it for you. A great title has an A+ grade and a perfect character score.
I like to combine RankIQ with AIOSEO for optimizing my titles. Ideally I want a title that both tools grade me high on. That’s when I know I have a winner.
2. Include enough keywords throughout and write a long enough blog post
You need to use a keyword research tool to find specific keywords to write about. I use Keysearch because it’s the cheapest option on the market and it gets the job done. Once I pick my target keyword I run a report on RankIQ.
The main reason why I love RankIQ is that it shows you all the related keywords you should use in your blog post and how long your blog post should be in the Content Optimizer tab.
How RankIQ works
Let’s look at an example where you see A++ as your content grade and a 3457 word count.
So that means that you need to use as many keywords as possible from the list the tool gives you until you get to A++. When you start writing you will see an F grade. Then as you use more relevant keywords the grade will increase to D-, then D, and so on until you get to A++.
The word count means that for this example you would have to write at least 3457 words to have the best chance to rank on the first page.
You can write your blog post in the RankIQ Content Optimizer tab. And it will show you how your content grade changes the more keywords you use. It will also show you when you hit the minimum word count.
This is what I do, I type all my blog posts in RankIQ and then I paste them into a new post on WordPress.
It’s such an easy tool to use and it helped me rank for so many blog posts! If a blog post I write is optimized in RankIQ I know I did my best to help it be up in the search engine rankings. The good news is that you can use it to update old posts too.
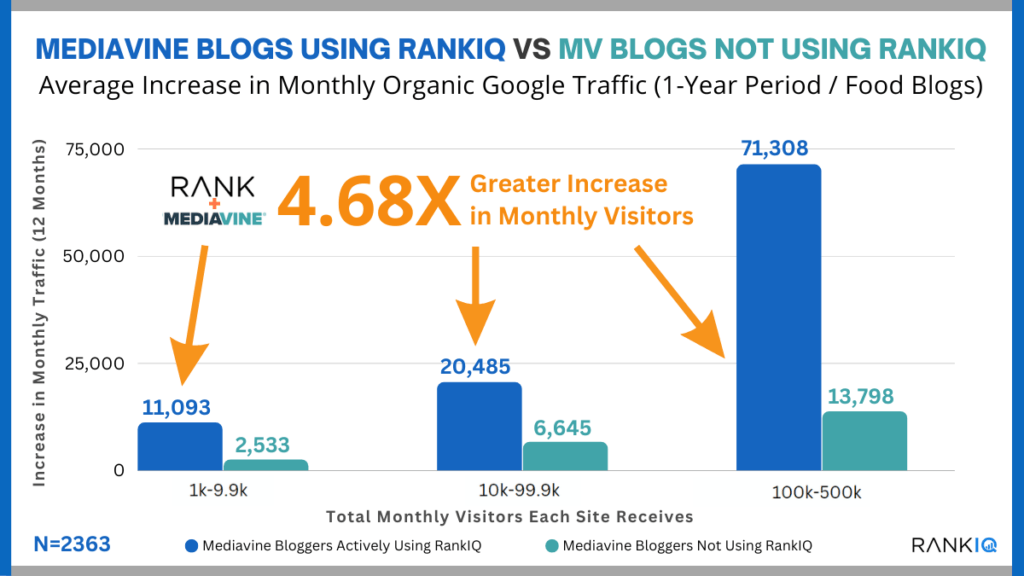
And it looks like RankIQ is working for a lot of other blogs too!
3. Write in first person to establish EEAT
As I mentioned before, EEAT is crucial for you to rank on Google. One way to show to Google that you have EEAT is to write in first person.
So if you’re writing about a destination that you visited make sure to write “I visited”, “I stayed at X hotel”, “I went on this day trip”.
Google will push content written by people who did what they write about.
On my travel blog, I never write about destinations I haven’t visited yet. That’s because I feel like it’s a bit strange to offer recommendations of places you haven’t been to.
I want people to trust me. And I don’t think you can trust someone who hasn’t experienced the place they write about.
Google thinks the same way as I do. That’s why showing Google you have EEAT is so important.
4. Optimize your headings
The title of your blog post is your Heading 1 or H1.
Then you need to come up with some Heading 2 subtitles. Let’s look at an example.
Let’s assume you write a blog post with “2 day London itinerary” as your main keyword. Your H2’s could be:
- Day 1 London itinerary: visiting popular attractions
- Day 2 London itinerary: hidden gems
So basically H2’s are subtopics of your main topics.
And then H3’s are subtopics of H2’s.
If we keep the same example, these are some H3’s you could use for the first H2:
- London Eye
- Buckingham Palace
- Westminster Abbey
It’s important to have these headings because it improves the readability of a blog post. Secondly, Google can easily find answers for questions people search for.
Make sure that each section you write is up to 300 words. If what you write is over 300 words you need to include headings.
The AIOSEO plugin will tell you that you don’t have enough keyword density in your headings if you don’t use the exact keyword you’re writing on. Ignore this.
That’s because your writing will be very repetitive if you use the same keyword in all headings. So in the London example above you shouldn’t write your H2’s:
- 2 day London itinerary: Day 1
- 2 day London itinerary: Day 2
Google actually doesn’t like it when you keyword stuff (basically when you use the same keyword a lot of times). So that’s why I’m telling you to ignore AIOSEO’s warning.
As long as you use logical H2’s that are related to your main topic you’ll be fine.
I personally mostly include H2’s and H3’s in my blog posts. Sometimes I might include H4’s. But I never do H5’s and H6’s – it’s just too much.
5. Optimize your pictures
You should include pictures in every single blog post you write. I upload at least 10 pictures per blog post. Usually, I try to include at least one picture per section.
That’s for two main reasons: 1) It makes the blog post easier to read 2) It makes your blog post longer, so it increases your ad revenue since people stay on your page longer
I mostly use pictures I take on my phone in a 9:16 format. That’s because a lot of people read on their phones, so I tend to optimize for this.
Compressing pictures
The first thing you need to do is to compress the image, which means you need to reduce its size. This is the free online tool I use to compress my pictures: Shortpixel.
You just have to upload the images you need to compress and then download them.
There is a plugin that does this. I used it and after a few blog posts it told me I used all the capacity in their free version, so I need to upgrade to the paid version. No, thanks!
As a new blogger trying to get your blog to grow and keep costs low, I only want to pay for what’s necessary. For me that’s my domain, hosting, Keysearch, and RankIQ.
So I compress my pictures manually using Shortpixel. Sure, it adds 5 extra minutes to your workflow. But I don’t think it’s that big of an inconvenience.
Naming the pictures
Once the pictures are compressed, I name them. You want to title them like you would describe to someone what’s in the picture. For example if I include a picture of me in front of the Royal Palace in Madrid I would title the picture “The author in front of the main entrance to the Royal Palace in Madrid”.
Then, you can upload your pictures to your blog post in WordPress. After you upload them go to the media library and update the “Alt text” section of each picture.
I just copy-paste the title of the picture in the Alt text section. This alt text helps search engines understand the content of your pictures.
Think of it as describing the picture for someone who can’t see. That someone who can’t see is Google. So by describing your pictures you help Google since there is an image section in any Google search. So you want another shot for your content to be shown to people.
6. Link to other blog posts that you already published
This is called an interlinking strategy. All you have to do is to include internal links to other blog posts you already wrote within the same category.
For example, one of the categories you write about can be Spain travel. That’s your cluster. And this cluster will have a lot of articles on this topic. These articles can be itineraries for different cities in Spain such as Madrid, Barcelona, Sevilla etc.
So now let’s say you write an article about a Madrid itinerary. You can link other blog posts about Spain such as a Barcelona itinerary or a Sevilla hidden gems guide.
At the same time you can link other articles you wrote about Madrid, such as “Where to stay in Madrid”, “What to eat in Madrid”.
This interlinking strategy helps Google discover other articles from your blog through crawling. And it also helps increase your EEAT since you write so much about a topic.
7. Make the changes suggested by your SEO plugin
I previously mentioned how you should have an SEO plugin and how I use AIOSEO.
The AIOSEO plugin (or whatever SEO plugin you end up choosing) will tell you how to optimize your blog post.
You will see multiple sections on the right-hand side of your blog post. Make sure as many of them are green. I try to get a score of at least 97/100 for all my blog posts.
The plugin is very user friendly and it’s easy to act on its suggestions. For example, if it tells you that you have 3 consecutive sentences starting with the same word you just need to change one of them.
Or if it tells you that you used too much passive voice just change some of the sentences to active voice until it gives you a green score.
Or if you didn’t use enough transition words, just add some more until you see a green score.
Super easy. Just try to get as many green scores as possible and try to have a score of at least 97/100 overall.
8. Have an author box
Another way you can convince Google that you’re in expert in your topic is to include an author box on all blog posts.
The author box has your picture and a few sentences about you. Write these sentences in third person. And include all relevant accomplishments for the topic you’re writing about.
If you start a travel blog, this can mean how many countries you traveled to. Or maybe you’re a published author, and you can include where your work has been published. Also, if you have a large following on a social media platform, include this as well.
I use a free plugin that includes my author box automatically on all blog posts. The plugin is called Simple Author Box. You can find all instructions on how to install it and configure it here.
Off page SEO tips
1. Have HTPPS and SSL certifications
An SSL certificate protects the privacy and security of people visiting your blog. This certificate makes your website load as htpps instead of http.
You need to buy the privacy + protection certification from your host. As long as you buy it and renew it every year you should be set.
2. Make sure you pass Core Web Vitals
Google also looks at page speed as a metric for ranking to make sure your web pages give readers a good user experience. All the different variables that influence how fast your blog loads are called Core Web Vitals.
You can find them in Google Search Console in the Experience section. Make sure to check periodically if you pass them.
If everything is ok you should see “X good URLs”, where X is the number of URLs you have on your blog. If something is off, you will either see “URLs need improvement” or “poor URLs”.
You can reach out to your hosting company if some of your URLs need improvement or are poor. In most cases they will help you fix this.
If they are not able to help you my advice is to hire a web developer for a few hours so they can quickly fix it for you.
I don’t think it’s worth it for you to try and learn how to develop a website, unless that’s one of your passions.
But for most of us bloggers we just want to publish great content that helps people and make money from it.
So outsourcing the tech part is the best idea.
3. Get high-quality backlinks
A very important part of off-page SEO is link building. What is a backlink? It’s when another website links to your blog.
This shows Google that you have EEAT since other, more established websites, link to you. If these websites trust you enough to link back to your blog, Google is more likely to trust your blog too.
Now the key here is that they need to be high-quality backlinks. Not spammy backlinks from terrible websites.
A high-quality backlink usually comes from a website with a high domain authority, or DA for short.
The domain authority is a term coined by Moz to gauge how trustworthy a website is. It’s a combination of how old your domain is, how many backlinks you have, and where these backlinks come from.
A lot of people try to get their own DA up. But the thing is Google doesn’t use DA as a metric for ranking your articles. So it’s pretty pointless to do this.
My travel blog has a DA of only 13 and most of my articles rank really well and I was able to get to 36K sessions in 16 months. My advice is to not worry about DA. Worry about producing optimized content and getting a few strong external links.
There are 3 main ways to obtain good backlinks: 1) guest posts, 2) helping a journalist with information, 3) just writing good content.
Let’s go over how you can use these 3 techniques to get some strong backlinks for your blog.
I started getting backlinks for my blog a few weeks after I launched it. They were high-quality links from very established websites.
Here is what I did.
Write guest posts
I reached out to more established travel blogs and asked them if I could write a guest post for their blog. In exchange, they would include 1-2 links back to my blog.
A lot of established bloggers accept guest posts because it helps them publish more content and it’s a way to give back to newer bloggers.
How can you find bloggers in your niche that accept guest posts? Easy. You do a Google search. You will find a ton of articles listing out many blogs that accept guest posts.
Before you reach out make sure you read the section on their website that describes their rules about guest posts.
Some bloggers want a minimum number of words, other bloggers want the article to be fully SEO optimized, some bloggers accept guest posts only on a small number of topics.
If you think their website is a good fit for your guest post, reach out to them. They tell you how to reach out to in the same section on their website where they explain all their rules about guest posts.
If they don’t reply in 3 business days make sure to send them a follow-up email. If you don’t hear back after the follow up email you can assume they are not interested.
Don’t take this personally. Just write to another blogger and eventually one of them will say yes.
Help a reporter out
The second strategy I use to get backlinks is to give information to a journalist on a topic they write about.
I got links from major publications such as Yahoo, Bored Panda, She Knows, Euronews, and The Daily Express this way.
There are so many news articles being written every day on the topic you’re an expert on. And these journalists need to quote experts in their articles. So it’s a win-win. They get information for their article, you get a backlink.
How can you find these opportunities? By signing up for Help a Reporter Out. This is a free tool that connects journalists with publishers and bloggers.
They send you email alerts every day with what journalists need help with. If these requests match your area of expertise send them a pitch with your answers.
Some of them will select your answer and will include it in their article.
Most of these links will be “no-follow”, but that’s ok. They still help you with SEO since they give you more visibility and they come from websites with DA 90+.
The links you receive from other bloggers will be “do-follow”. So I think you should use both strategies, so you get both types of links.
Write high-quality content
If you give your readers valuable information in every travel blog post you publish you will naturally obtain backlinks. That’s because people will recommend your articles on forums, on their own blogs, or in the news.
I even had journalists from major publications reach out to me to say that they have been following my blog for a while and love my posts. And that they would like to feature me in articles about solo travel. How cool is this?
And to be fair, it’s the easiest way to get a backlink since you don’t have to do any additional work. You just publish valuable content that’s worth reading and you attract the backlinks.
Final thoughts
These are the basics of SEO for a travel blog. This is exactly what I did to grow my blog to 36K sessions in 16 months. Now my blog makes me over $2,500 per month through ads and affiliate links.
There might be other SEO strategies out there. But you don’t need to be an SEO expert or overwhelm yourself with learning about every single SEO strategy on planet Earth.
Just use these basic tools I taught you about and you’ll be able to grow your blog. If I could do it, so can you.
I’m not special, I didn’t study blogging/SEO/marketing in school. I am self-taught.
The key with blogging is to be patient. You won’t see the results overnight and you won’t get rich in a few days/weeks/months.
You have to do this work continuously for at least 1 year to see some results. It takes about 2 years to get to 50K+ sessions and to make $5,000+ per month.
So be patient and do the work. Even when you’re questioning yourself, when you feel like quitting or when it’s hard.
Most people quit when they don’t see fast results. Don’t be one of them! Keep going, keep hitting publish and keep optimizing.
And the day will come when you get the results you want and it will all be worth it.
I’m rooting for you! I know you can do it. Let’s get it!
Do you need more blogging tips? Check out some of my other articles.
Amateur blogging: complete guide to start a blog
Stay22 review: is this affiliate platform the best?
RankIQ review: is this the best SEO tool for blogs?

Ioana was born and raised in Romania, lived in NYC for 14 years, and is now back in Romania. She fell in love with traveling when she was little and used to visit her aunt in Vienna. Then in high school she was able to visit Siberia, Turkmenistan, Istanbul, and Tokyo through chemistry competitions. As an adult she started to travel solo once she turned 30 and visited 20+ countries so far. Ioana is a full time travel blogger and content creator with an audience of 75K+ people on Instagram. She loves to share travel recommendations and tips.